October 1916 ... The Somme
|
The Royal Naval Division was moved south to become part of the Somme offensive and, on October 4th, was transferred to the Vth Corps of the Fifth Army under the command of General Hubert Gough. Once on the Somme, the Naval Brigades began training for the forthcoming assault while the officers reconnoitred the enemy positions. The 190th Brigade entered the trenches, which were found to be in very poor condition and heavily damaged by German artillery. The men could only stand in the trenches, as there was nowhere to lie down, and there were very few dugouts. The communication trench ran along a ridge that the Germans could fire upon. When not in the trenches, the men were under canvas at Englebelmer, but each night they had to take supplies to the front through mud that was often above knee height. On the thirteenth, Major-General Paris visited the front line and was seriously wounded, while his staff officer, Major Sketchley, was killed. This was a major blow to the Division, as the General was greatly respected by all ranks. General Paris was replaced by Major-General Shute, who had scant regard for the Naval traditions maintained by the Division. The Army had made a number of attempts to bring the Royal Naval Division to heel, disliking their traditions and paraphernalia, and this was seen as yet another such effort. Shute was not honoured by his appointment and doubted the effectiveness of the Division in combat. After inspecting the trenches the Division occupied, he wrote a formal complaint to High Command. By mid-October, the location of the attack had been decided, operational orders issued, and the men began digging assembly trenches for the assault, as the existing trenches were totally inadequate for the purpose. At this time, the men were reported to be in poor condition after twenty months of continuous campaigning without any leave. The average battalion strength had fallen from around 700 to 500 due to the strain placed upon them. | ||||||||||||||||||||||||||||||||||||||||||||
 |
The assault was to take place north of the River Ancre in front of Hamel, and the Royal Naval Division had four objectives: firstly, the third and final trench of the German front-line system; secondly, Station Road, which ran from Beaumont to the Albert–Lille Railway; thirdly, the trenches on the outskirts of Beaucourt-sur-l'Ancre; and finally, the village itself. The first objective, known as the Dotted Green Line, and the third objective, the Yellow Line, were to be attacked by four battalions advancing in four waves. These would then rest at the objectives and allow the second attacking group to pass through and take the second objective, the Green Line, and the fourth objective, the Red Line. The defences in this area had been greatly strengthened since the opening attacks of July, and the Germans believed they were impregnable.
The attack was originally planned for October but had to be postponed due to poor weather, which turned the trenches into a virtual quagmire and made the roads to them almost impassable. This delay gave the Germans time to reorganise their troops and strengthen their positions further, as preparations for the pending attack could not be concealed from the enemy's observation balloons and aeroplanes. While waiting for the weather to improve, the Division was inspected by Sir Douglas Haig at Englebelmer. |
|||||||||||||||||||||||||||||||||||||||||||
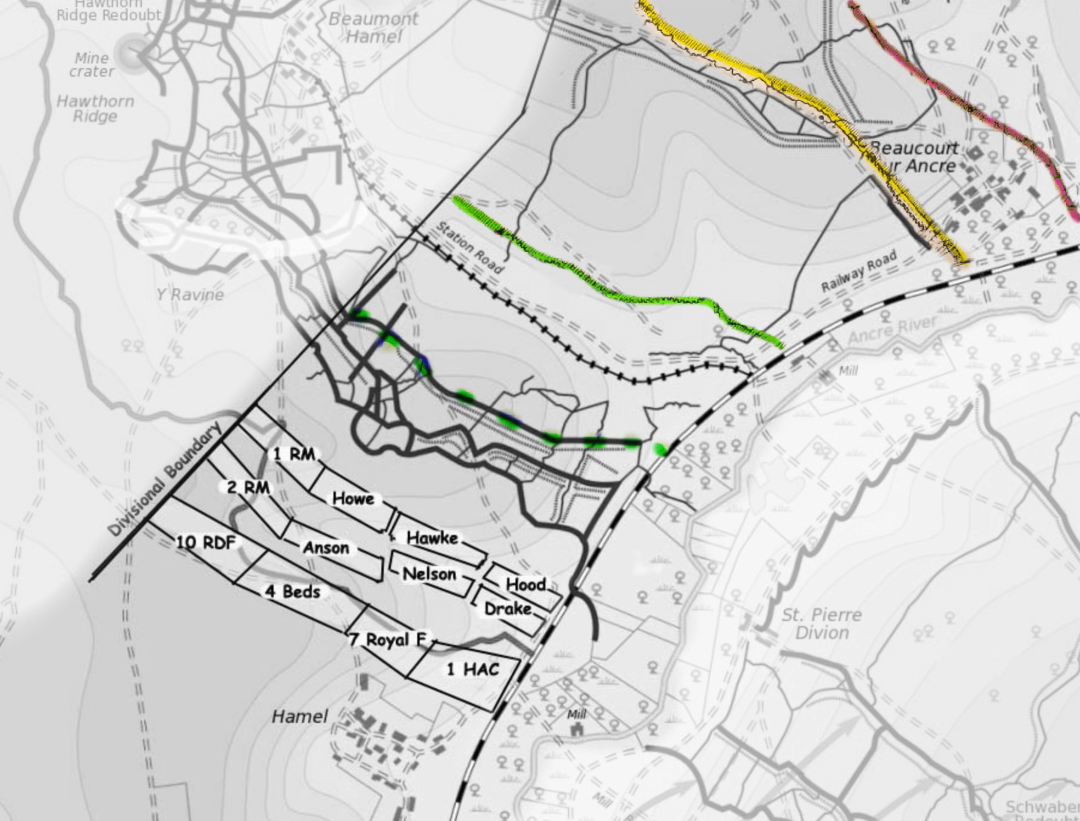 Battle of the Ancre objectives The weather improved and the attack was scheduled for November 13th. On the sixth, the preliminary bombardment commenced, and its intensity was increased each morning to give the impression that an attack was imminent before the barrage decreased again. This had been a tactic employed in Gallipoli to put the enemy to sleep. | ||||||||||||||||||||||||||||||||||||||||||||
|
During the twelfth, the Division moved into the trenches from which it would advance the following day. This was completed, and the Division was in position by 20:30. The trenches were cramped, and many of the men had to lie out in the open during the night. Orders stated that bayonets were to be fixed during the night to prevent the early morning sun from glinting on hundreds of bayonets and giving away the forthcoming attack, as the trenches were under observation by the Germans on Thiepval Ridge. The first wave was to move out of the trenches behind a creeping barrage, a tactic developed by the British to counter the horrendous losses experienced on the first day of operations on the Somme. The men would move forward twenty yards or so behind the exploding shells, which would advance one hundred yards every five minutes. As the barrage moved forward over the trenches, the enemy would not have time to take up their defensive positions before the advancing troops were upon them. The barrage commenced at 05:45, and the two Naval Brigades attacked through heavy gloom and mist along the left shore of the Ancre, with the 51st Highland Division on the left and the 39th Division on the opposite bank of the river. Of the Royal Naval Division, the Howe and 1st RMLI battalions launched the attack of the 188th Brigade—Howe on the right—with Anson and 2nd RMLI as the second wave. To the right, Hood and Hawke launched the attack of the 189th, with Hawke on the left and Nelson and Drake as the second wave. The 190th Brigade was in support. The land sloped down towards the German trenches, but the mud and shell damage impeded progress. |
 |
|||||||||||||||||||||||||||||||||||||||||||
| Within moments of the first wave moving out of the trenches, a deadly German barrage fell on the Division with great precision, creating chaos in the 1st RMLI Battalion. The four company commanders, many of the NCOs, and numerous men were killed while crossing no man's land. | ||||||||||||||||||||||||||||||||||||||||||||
 |
Hood, followed by Drake, encountered heavy enfilading machine-gun fire from the left, causing considerable losses, but the front-line system was captured with 300 prisoners. A knoll, which formed the southernmost part of the German system north of the Ancre, was captured, and the dugouts along the railway embankment were cleared by 06:45. A commander of Hood was killed in a successful attack on a machine-gun emplacement that threatened to enfilade the entire assault.
The Hood advance should have halted upon taking the German trench system, with Drake going on to take the ridge beyond Station Road. However, Drake had been drawn into the battle for the German trench lines and had lost half of its force, including a number of officers. Lieutenant-Colonel B. C. Freyberg, who had been awarded a DSO for his actions at Bulair, continued to advance with Hood and the remnants of the Drake Battalion, supported by machine-gun fire. The attack succeeded, and the Green line was reached. The dugouts on Station Road yielded another 400 prisoners. On the left, as the Hawke Battalion approached the first line, it came under devastating machine-gun fire from a redoubt between the first and second lines. Around twenty men managed to get past the redoubt and continued under Colonel Freyberg's command. Nearly 400 of Hawke’s men became casualties under the fire of this strongpoint. The first two waves of Nelson managed to advance but fell well behind the barrage, and approximately half of the force was lost in attacking the Station Road positions, where much of the fighting was hand-to-hand. The third and fourth waves of Nelson came under the same fire that had devastated Hawke, as the barrage had completely missed the redoubt. |
|||||||||||||||||||||||||||||||||||||||||||
|
The Howe Battalion had kept up with the barrage and had entered the German trenches despite the attack on the redoubt failing and the Battalion's flank being exposed to machine-gun fire. Only one officer and twenty men of the Battalion managed to reach the third line, and they were unable to hold the position. The Germans moved out of the redoubt and reoccupied the line. However, almost two hundred men of the Anson Battalion were able to move through and onto the Green line at Station Road.
The third and fourth waves of the 1st RMLI attack on the extreme left managed to break through the first two lines, but in taking the last line of trenches, the Dotted Green line, they came under heavy fire from the flank, and only isolated pockets were established. The 2nd RMLI, following behind, became involved in hand-to-hand fighting in the third line, fell behind the barrage, and only a small party was able to break through and make contact with the 51st Division on Station Road. The redoubt was causing a problem for the Royal Naval Division; it was behind the units that had reached Station Road, and at 06:30 a number of battalion headquarters staff went forward to attempt to resolve the situation. The attempt failed, but a brigade report centre was established in the second German line on the Howe front, enabling the consolidation of the hold on the first two enemy lines to be organised. |
|
|||||||||||||||||||||||||||||||||||||||||||
|
At 07:30, following a pause on the Green line, the barrage lifted, signalling the attack on the Beaucourt Trench, the Yellow line. On the extreme left of the 188th Brigade, no advance was attempted as the Marines were in touch with the 7th Gordon Highlanders from the 51st Division. Colonel Freyberg led one of two independent assaults on the Yellow line, with both groups falling just short of the line but without serious losses. Colonel Freyberg's position was on high ground and of tactical importance, whilst the other position was overlooked by the enemy.
General Shute decided that the 188th Brigade was to be reinforced by the 190th and fight its way across the German front line system on the left before the successes on the right could be exploited. This resulted in a postponement of the attack on Beaucourt village, which was scheduled for 08:30. The 188th was engaged in continuous fighting, and by 17:00 it had occupied and retained sections of the enemy lines through to the Yellow line, although the German strong point still held firm. On the night of the thirteenth, there was considerable confusion as to what was actually held, with many trenches obliterated and distances impossible to calculate. Colonel Freyberg had been reinforced by a battalion from the 111th Brigade of the 37th Division and by the 7th Royal Fusiliers from the 190th Brigade for the attack on the Yellow line and Beaucourt itself. |
|||||||||||||||||||||||||||||||||||||||||||
|
For the day's fighting the Royal Naval Division recorded 793 of its men as killed-in-action:
A slow bombardment was maintained throughout the night. At 06:00, the intensity of the barrage was increased on the first objective for the day, the Beaucourt trench, and at 06:20 the infantry attacked. | ||||||||||||||||||||||||||||||||||||||||||||
|
At 06:30, two of three tanks—one had been disabled by a chance shell—advanced from Auchonvillers to cross no man's land. One of these stuck in the mud before reaching the German lines, but the second continued to advance towards the German strong point before it also became stuck in the mud, four hundred yards short of the position. However, it was able to fire on the redoubt with its 6lb gun, and after a brief bombardment, the position was surrendered with four hundred prisoners taken. The Howe and Anson battalions cleared the trenches of the second and third lines before pushing on to the Green line. At 07:45, the attack on Beaucourt was commenced by the 190th Brigade, which had collected near the railway station. The attack came under heavy rifle and machine-gun fire, and the men had to take up positions alongside the units of Colonel Freyberg. Despite having been wounded several times, Freyberg led the assault straight into the village with detachments from the Hawke, Drake, and Nelson battalions and the 190th Brigade. Encountering little resistance, the village was captured with five hundred prisoners taken by 10:30, and during the remainder of the day, the hold on Beaucourt was consolidated. Lieutenant-Colonel Freyberg was taken back from the village that evening, having been severely wounded by a shell, and was later awarded the Victoria Cross for his decisive actions during the battle, in which he was wounded four times. |
|
|||||||||||||||||||||||||||||||||||||||||||
 |
At midnight, the 37th Division began to relieve the Royal Naval Division, and at 12:00 on the fifteenth, Major-General H. B. Williams took over command from General Shute. To the left, the Scottish 51st had successfully captured Beaumont Hamel, and to the right, the 39th had taken St Pierre Divion. The Royal Naval Division had advanced further and taken more prisoners than any other division involved in the battle; the Division had captured a total of two thousand Germans. The losses had been substantial, but during the afternoon, the remnants of the 188th and 189th brigades marched back to the camp at Englebelmer. The 190th Brigade, having inevitably sustained fewer casualties than the Naval Brigades, remained behind temporarily to clear the battlefield. Only days before the battle, General Shute had reported to Corps Command that the Royal Naval Division was far below the standard of Army units. The Division had then captured one of the strongest points on the entire German line, something the Army had failed to do. It is no surprise that all ranks of the Division attributed the victory on the Ancre to the organisation, energy, and forethought of Major-General Paris. After the battle, the Division was moved behind the lines for a period of rest in the vicinity of Rue. For each day of November 1916, the Division had lost an average of three officers and 53 men, nearly four thousand dead and wounded by the month's end. | |||||||||||||||||||||||||||||||||||||||||||
|
||||||||||||||||||||||||||||||||||||||||||||